
FlexiPOS v3.0.40 and above supports item barcode scanning. You can save the unique barcodes against your items in the supplier portal. Using FlexiPOS you can simply scan the product barcode to add the item to a sale, rather than find it on screen.
Before you begin
Make sure that:
- You are using FlexiPOS v3.0.40 or above.
- Each item has a unique barcode entered in the SKU field within the Supplier Portal.
- You have enabled multiple payment methods in FlexiPOS:
- Student Card + Cash, or
- EFTPOS, or
- Both.
- If using a peripheral scanner, ensure the scanner is connected to your device via USB or Bluetooth.
- If using the device camera, ensure camera permissions have been granted.
To use the functionality follow the following steps:
Step 1: Add the barcode number to the item in your supplier portal in the SKU field:
- Sign in to the Supplier Portal.
- Open the item you want to configure.
- Locate the SKU field.
- Enter the item's barcode number into the SKU field.
- Select Save to update the item.
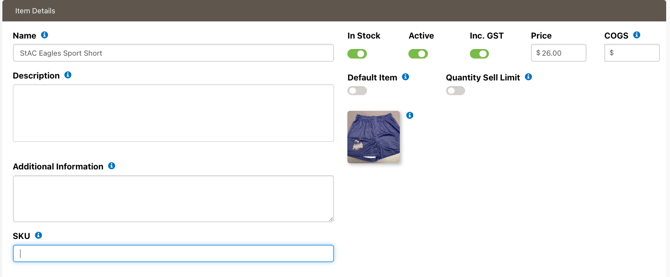
TIP: You can use a barcode scanner to enter this value, connect your scanner to the computer or device you are accessing the supplier portal on, tap in the SKU field and scan the barcode.
Step 2: Refresh FlexiPOS data
After updating the barcode in the Supplier Portal:
- Sign out of FlexiPOS if you are currently logged in.
- Sign back in to ensure the latest item data is downloaded.
Step 3: Enable Item Barcode Scanning
-
Go to the settings page (first ensure you have either cash and/or eftpos enabled) where you will see "Item Barcode Scanning" and a drop down selector. By default it will be disabled which means item barcode scanning is OFF. To enable choose the way you will be scanning barcodes from the drop down list.
-
"Peripheral Scanner" - if you have a USB or Bluetooth barcode scanner attached to the device
-
"Device Camera" - if you want to use the on board device camera to scan the items.
TIP: Please ensure you log out and log back in again to save changes.
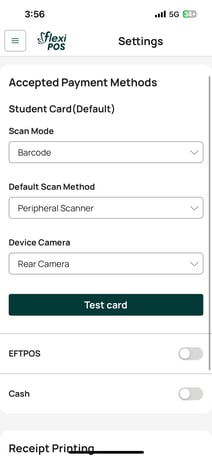
Step 4: Scan items during a sale
-
Go back to your items page and start scanning items. If you are using a peripheral scanner just start scanning. If you use the device camera you will need to hit "Scan Barcode" button to scan your first item in a sale.
Note:
- You must have multiple payment methods enabled to setup item barcode scanning - either student card + cash OR EFTPOS or both - otherwise FlexiPOS expects a student card scan by default.
- Multiple scans of the same item will increase the quantity
- You can switch between using item scanning and using the item selector on screen in a single sale
- If you are having trouble with the scanner scanning the correct barcode - try adjusting the scanners delay in sending the information (this will be a programable feature of your barcode scanner)
- FlexiPOS will search for unique barcodes across both items and options - so make sure they are all unique. If FlexiPOS finds a matching barcode number on an option it will add the parent item + the option to the cart.
Sample video showing the use of the device rear camera for item barcode scanning: